
>
Lenses for Video Motion DetectionThe correct selection of lenses for use in a VMD application can be more critical than in many other types of system. There are many VMD systems in operation that are less effective than they could be due to insufficient thought given to the lenses used. This article explores a structured approach to calculating the most suitable lens based on certain established parameters. The development of the theory is provided for two reasons. First, to establish the credibility of the reasoning used and therefore confidence in using the tables provided. Second, those people competent with using formulae can adapt the results to other situations. It is reasonably simple to incorporate the equations into a spreadsheet program to provide solutions for any combination of factors. THE 10% RULE There is an empirical rule used widely in CCTV system design that in order to distinguish a person on a monitor, they must be at least 10% of the height of the screen. 'To distinguish' in this context, means that the image can be seen to be a person. This 10% is also considered to be the minimum resolution necessary for an efficient VMD system to recognise an alarm situation. Many VMD systems will certainly respond to smaller targets, but with the probability of generating a higher number of false alarms, and the difficulty of identifying the cause. There may be occasions where a different factor is required, in these cases the equations can be adapted to the need. The target size The standard target size has been taken as being 1.8 metres high. This represents an average height person passing through the field of view. Again, if a different target such as a person crawling, is a design parameter then the equations can be adjusted accordingly. Establish the maximum lens angle of view The following equations establish a simple method of calculating the ideal lens angle of view. This factor used to establish the maximum angle of lens is that the 1.8 Metre target will be a minimum of 10% of the screen height.
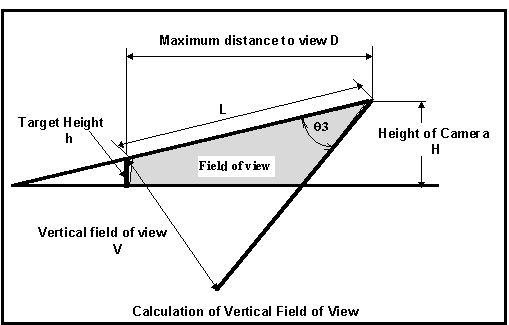
The preceding diagram illustrates the lens angle projected to show the vertical field of view at the target. The dimension 'V' will be the vertical field of view on the monitor. The cameras are normally set at a very shallow angle, therefore the slight difference between the plane of the target to the normal plane of the camera can be ignored.
Where: q 3= the maximum angle of the lens, H= The height of the camera. D= the maximum distance to view the target. It can be shown that for the distances and lenses used in CCTV 'L' is almost equal to D. Therefore the above equation is simplified to:
From this the general equation for the maximum angle of lens will be:
Therefore to incorporate the image within 10% of the screen height the, dimension V must be 10X the image height. For a target image of 1.8 M the vertical field of view must be a maximum of 18M. This factor can be used to establish the maximum vertical angle of a lens to satisfy any situation. Assuming V=18 M, the maximum vertical angle of the lens will be:
This is the lens angle of view that must not be exceeded to satisfy the requirements.
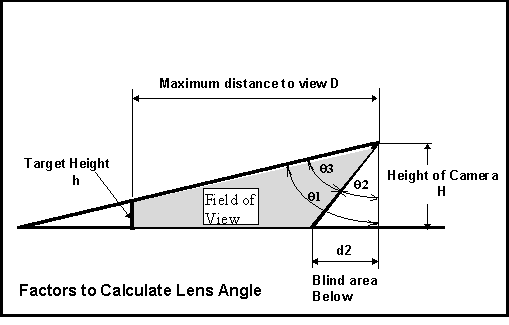
The distance to view D=50M. Then the maximum lens angle = 20.40° CCD Cameras are now available with sensor diagonal dimensions of 2/3", 1/2", 1/3", ј" and possibly 1/5". Lenses are available designed for all these formats. A lens of one format will have a different angle of view on different formats of camera. For this reason ,lenses shall be specified by the required angle of view, not simply the focal length. The selection of the correct lens is critical to achieving the requirements specified. The angle of view taken from a manufacturers' specification cannot be used by itself to decide the correct lens for an application. The reason is that the camera is invariably positioned higher than the target and pointing downwards. The following equations may be used to determine the lens that will satisfy the requirements..
It is assumed that the starting point for determining the camera lens required will be for a particular location with a preferred field of view. Therefore D will be defined and d2 will be estimated to calculate the preferred field of view. The angle to the target will be: The angle of the blind area will be: The lens angle of view will therefore be: Therefore: This will give the theoretical lens angle of view, it will then be necessary to select the nearest standard lens available. The distance to the target and the target height will be in accordance with the design parameters. Therefore, it is then necessary to recalculate the blind area below the camera. This will be:
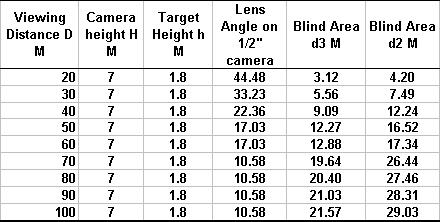
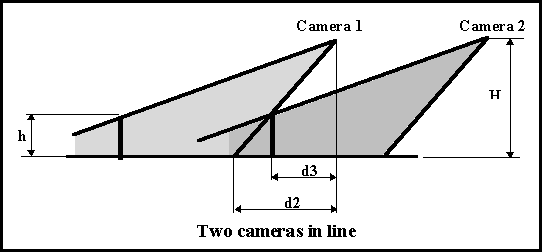
From this data the lens angles and spacing of cameras can be determined. The following information is assumed: Camera type: 1/2" CCD Camera View: Normal (4:3) Distance to view D: 50 metres Blind area d2: 10 metres (estimated) Target Height h: 1.8 Metres Camera height H: 5 Metres The angle to the target: The angle of the bind area: The lens angle: The nearest standard lens is a 16mm 2/3" format which on a 1/2" camera which will give a vertical angle of view of 17.03° . The maximum lens vertical angle for this configuration was shown in the previous example to be 20.40° , therefore this selection is acceptable. It is now necessary to calculate the near point of view: The angle to the near point is: Therefore this lens selection will cover a target of 1.8M high at 50 M, and will be a minimum of 10% of the screen height. The blind area below the camera will be 13.24 M. The preceding calculations produced the distance in front of the camera at which the foreground field of view just cut the floor line. If there are two cameras in series then one camera will cover some of the blind area below the first. It is necessary therefore to calculate the blind area only to where the target will picked up by another camera.
The area to be covered by the second camera is d3, which is equal to:
Where H is the height of the camera h is the target height d2 is the distance of the blind area. q 2 is the angle of the blind area. From the previous example: H=5M h=1.8M d2=13.24M q 2=69.3° (recalculated value) Therefore : Therefore if the second camera is to the same lens specification it needs to be positioned 50-8.47=41.53 Metres before. This will ensure that there is no blind area below the first camera. The following table summarises the maximum lens angle to suit the requirements of a 1.8 metre target being at least 10% of the screen height. The lens angles have been taken from the Pentax-Cosmicar range as examples, but information may be obtained from any manufacturer and substituted.
Table 1 maximum lens angles
The next tables show the blind areas below a camera based on the camera height and a 1.8 metre target for camera heights of 5.0 and 7.0 metres. The lens angles have been taken from the preceding table for each distance to view. table 2 Camera mounted 5 metres high
table 3 Camera mounted 7 metres high
The simple procedure The following simple procedure will ensure that the lens selection and camera locations will always be correct within the requirements. 1. Obtain the maximum lens vertical angle for a required distance to view from table 1. 2. Find the nearest available lens angle LESS THAN that angle. 3. Find the blind areas from tables 2 or 3. 4. The camera locations can then be drawn on a scale plan of the site.
Lenses for Video Motion Detection Systems
One of the reasons that some systems are not designed in sufficient detail is that the calculations necessary can be quite time consuming. This frequently because few people are comfortable with the maths involved, and many of the various lens calculators is not very accurate. The concept outlined in this article means that anyone can take advantage of the elegance of the method without any knowledge of mathematics. It only needs the ability to copy the equations given into any spreadsheet application. You could even put it on a Psion organiser and carry it wherever you go.
In the July issue, the formulae were given to calculate the correct lens to satisfy the minimum requirements for a video motion detection application. Although useful, the procedure can be tedious and a certain knowledge of maths is necessary together with a calculator having trigonometric functions. This feature continues the theme and illustrates a simple method of combining these into a spreadsheet so that any variable can be found immediately and automatically. The following diagram is repeated from the last issue and shows a typical perimeter detection arrangement of cameras.
The table below lists the blind areas for a camera height of 5M and a target height of 1.8M. An extra column has been added to list the maximum angle of view for a 10% screen height. However these may not always be appropriate for every situation, for instance the camera height or target may be different. In which case the following spreadsheet will provide solutions for any combinations required. The table is shown with the typical column and row headings for most spreadsheet programs. The lens angles shown are typically available lenses for a 1/2" camera format, but any others may be substituted.
The following formulae syntax are for Microsoft Excel, but most other applications follow almost identical syntax. The = sign signifies that a formula is being entered, some applications require a + sign. Apart from this the syntax should work in any program. Note, the $ sign before a cell reference makes it an absolute reference and saves copying the camera and target height down all the rows. The only other possible change in syntax may be that for entering the value for PI. The Excel format is PI(), the brackets in this case being part of the syntax, not part of the equation. Some applications use only PI, if you are not sure replace PI() in the equations with 3.1429. Once the formulae have been entered, the values of B2 and C2 may be changed to suit the application in mind and all the other values will be updated automatically. The values of B2 and C2 can be in any units, providing, of course, they are both the same. Particular care is needed when entering the formulae exactly as they are shown, especially the order of the brackets. (/ represents a division, * a multiplication, PI() the value of PI=3.1429, ATAN means the 'tangent whose angle is' sometimes ARCTAN or TAN-1 ) Enter the range of viewing distances you prefer in column A Enter the camera height and target height in cells B2 and C2. The values in column E are vertical angles and are entered manually and would be taken from your preferred manufacturers' brochure. Note: Actual lens angles must be entered in column E to produce the correct blind areas. If you wish to mount the cameras and monitors vertically. Substitute the lens horizontal angle for the vertical in column E. Maximum angle of view This calculates the maximum angle of view that must not be exceeded to satisfy the '10%' requirement. Enter the following formula into cell D2
=2*ATAN(($C$2/0.2)/A2)*180/PI()
Formula for two cameras, to calculate d3. Enter the following formula into cell F2..
=($B$2-$C$2)*(TAN(ATAN(A2/($B$2-$C$2))-(E2*PI()/180)))
formula for single camera, to calculate d2. Enter the following formula into cell G2
=$B$2*(TAN((ATAN(A2/($B$2-$C$2)))-(E2*PI()/180)))
Once the formulae have been entered into E2 F2 and G2, copy them down the columns to insert the relative references into the other rows. You do not need to have a range of distances to view. You can just leave row 2 and change the distance, camera height and target height each time you need to calculate a new situation. The values in column A can be anything you like, all other variables are calculated from the current values. Once the formulae have been entered, try changing camera and target heights and see the other variables change accordingly. Other uses for the spreadsheet. The spreadsheet is not just limited to calculating lenses for video motion detection, it can be used to calculate the areas of view for any situation where the size of the blind area below a camera is required. There may be occasions when the nearest standard lens has an angle just above the maximum recommended in the table. With the spreadsheet the answer is simple. Try one of the following: Increase the target height slightly and see the new minimum angle of view. You can decide whether this is an acceptable compromise. Maybe you were conservative with the distance to view. Change to a slightly shorter distance and again see the new angle. You can add columns to the end of the table, listing other camera formats and lens angles as a reference. These could then be copied into column E according to the application being considered. Note: Only add columns from column H onwards. If you insert columns, it could change the relative cell references. Happy playing! |
|
|
|||||||||||||||
| R.S.C. Broadband Supply Co. © 2006 • Privacy Policy • Terms Of Use | ||||||||||||||||
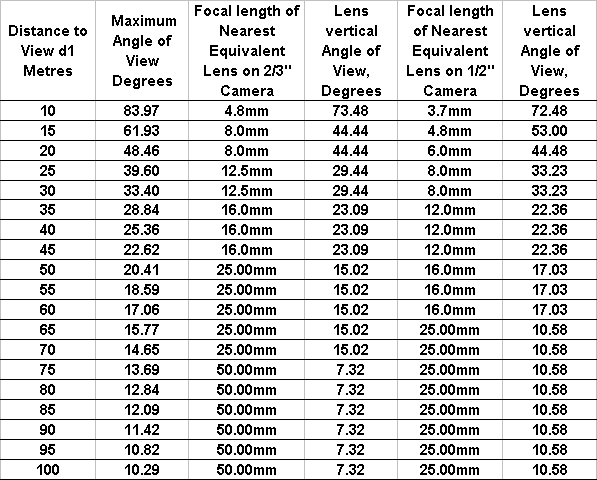 The
significant feature of the table is to establish the maximum lens angle for a
given length of view. It can also be used to find the maximum distance to view
for any given lens.
The
significant feature of the table is to establish the maximum lens angle for a
given length of view. It can also be used to find the maximum distance to view
for any given lens.